Remote IoT Platform SSH Raspberry Pi Free: Your Ultimate Guide
In the era of connected devices, remote IoT platforms have become indispensable tools for managing and monitoring internet-of-things systems. By leveraging SSH (Secure Shell) on a Raspberry Pi, you can create a secure and cost-effective remote access solution without spending a dime. This comprehensive guide will walk you through everything you need to know about setting up a free remote IoT platform using SSH on Raspberry Pi.
Remote IoT platforms allow users to interact with devices from anywhere in the world, making them ideal for home automation, environmental monitoring, and industrial applications. With the rising popularity of Raspberry Pi as a versatile microcomputer, integrating SSH capabilities provides a secure and efficient way to control IoT devices remotely.
Whether you're a hobbyist, a developer, or a professional looking to explore IoT solutions, this article will equip you with the knowledge and tools needed to set up a free remote IoT platform using SSH on Raspberry Pi. Let's dive in!
Read also:Kelsey Owens Net Worth A Comprehensive Guide To Her Career And Financial Success
Table of Contents
- Introduction to IoT and Remote Platforms
- Raspberry Pi: The Heart of Remote IoT
- What is SSH and Why Use It?
- Setting Up SSH on Raspberry Pi
- Remote Access Methods for IoT
- Securing Your Remote IoT Platform
- Free Options for Remote IoT Platforms
- Common Issues and Troubleshooting
- Real-World Use Cases
- Conclusion and Next Steps
Introduction to IoT and Remote Platforms
The Internet of Things (IoT) has revolutionized the way we interact with technology. IoT platforms enable devices to communicate, exchange data, and perform actions autonomously. A remote IoT platform extends this capability by allowing users to manage and monitor devices from distant locations.
One of the key challenges in setting up a remote IoT platform is ensuring secure communication. This is where SSH comes into play. SSH provides a secure channel for accessing and managing devices remotely, making it an essential tool for IoT enthusiasts and professionals alike.
Using a Raspberry Pi as the foundation for your remote IoT platform offers numerous advantages. It is affordable, energy-efficient, and highly customizable, making it an ideal choice for both beginners and experts.
Raspberry Pi: The Heart of Remote IoT
Raspberry Pi is a single-board computer that has gained immense popularity due to its versatility and affordability. It can be used for a wide range of applications, from educational projects to complex industrial solutions. When combined with SSH, Raspberry Pi becomes a powerful tool for building remote IoT platforms.
Some of the key features of Raspberry Pi that make it suitable for IoT include:
- Compact size and low power consumption
- Multiple GPIO pins for interfacing with sensors and actuators
- Support for various operating systems, including Linux-based distributions
- Community-driven support and extensive documentation
By leveraging these features, you can create a robust remote IoT platform that meets your specific needs.
Read also:Tyler The Creator Concert Tour A Journey Through Music And Creativity
What is SSH and Why Use It?
SSH, or Secure Shell, is a network protocol that provides secure communication between devices over an unsecured network. It is widely used for remote login, command execution, and file transfer. SSH ensures that data transmitted between devices is encrypted, protecting it from unauthorized access and interception.
Using SSH for your remote IoT platform offers several benefits:
- Encryption of all communication
- Authentication of users and devices
- Support for secure file transfers
- Compatibility with a wide range of devices and operating systems
By implementing SSH on your Raspberry Pi, you can ensure that your remote IoT platform is both secure and reliable.
Setting Up SSH on Raspberry Pi
Installing SSH
The first step in setting up SSH on your Raspberry Pi is to install the necessary software. Most Raspberry Pi operating systems, such as Raspbian, come with SSH pre-installed. However, you may need to enable it manually.
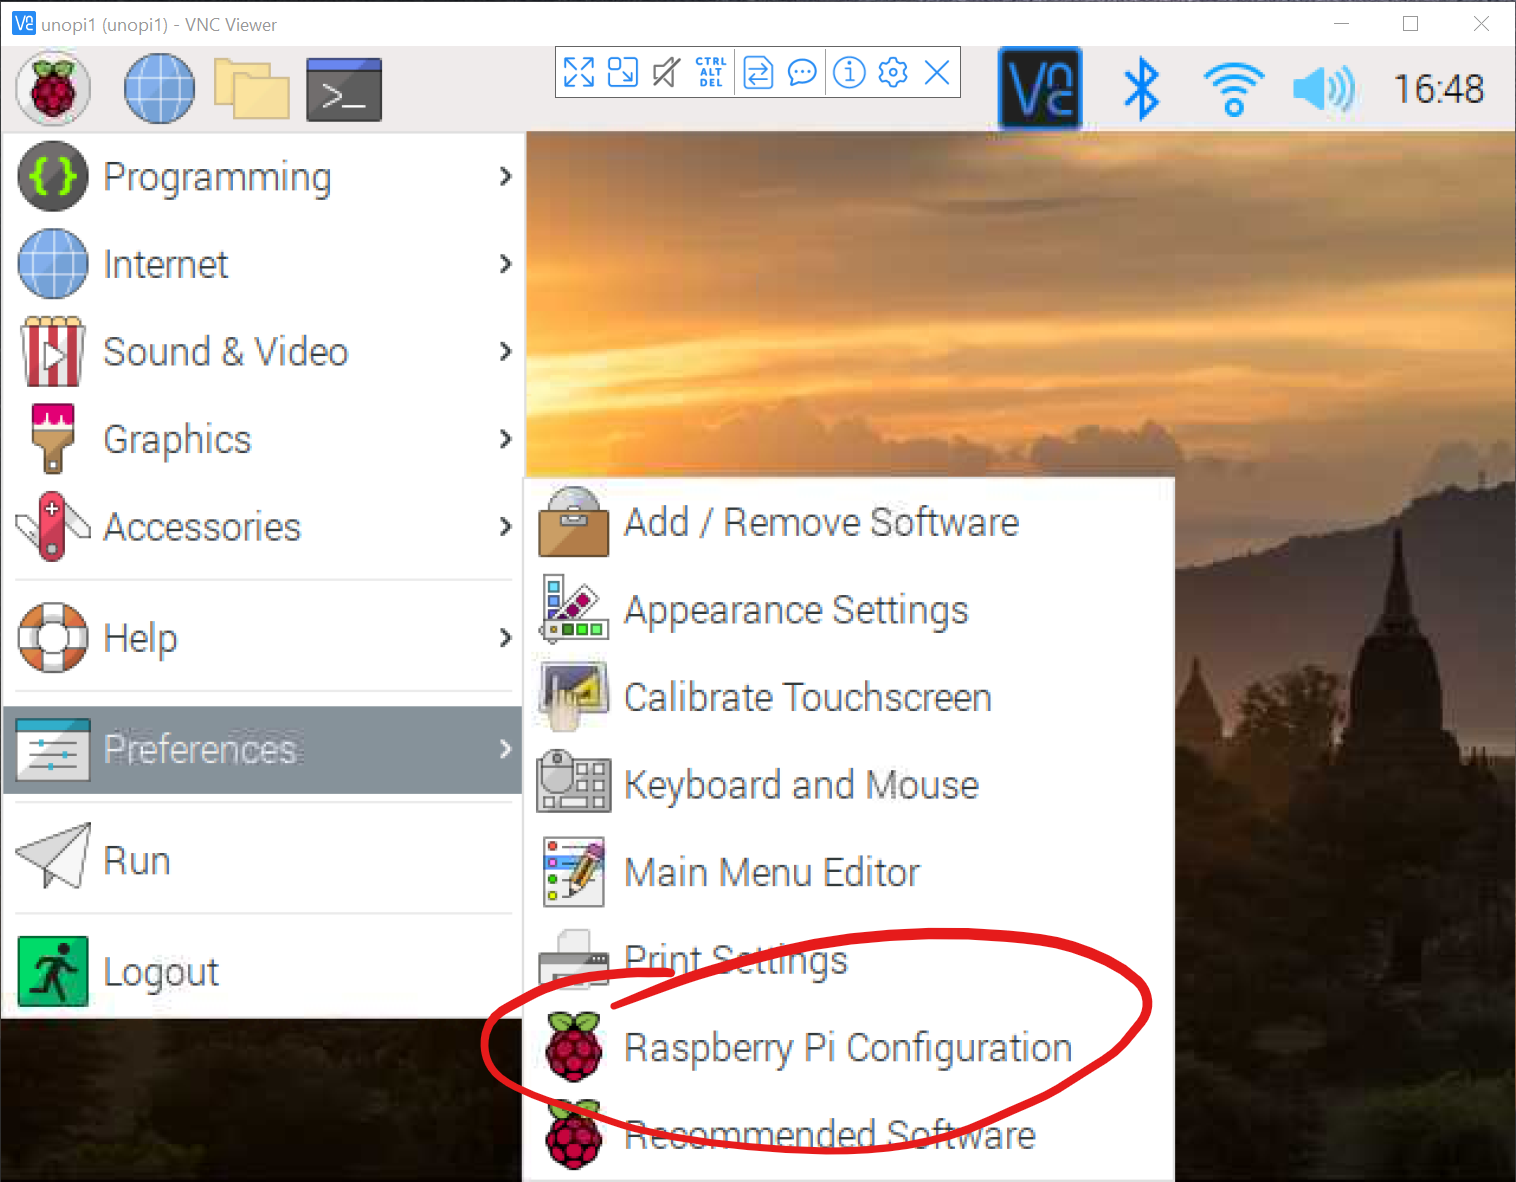
To enable SSH on your Raspberry Pi:
- Access the Raspberry Pi Configuration tool from the main menu.
- Navigate to the "Interfaces" tab.
- Select "SSH" and choose "Enable."
Alternatively, you can enable SSH from the command line by running the following command:
sudo systemctl enable ssh
Once SSH is enabled, you can proceed to configure it according to your requirements.
Configuring SSH
Configuring SSH involves modifying its settings to enhance security and optimize performance. The main configuration file for SSH is located at /etc/ssh/sshd_config. You can edit this file using a text editor such as nano or vi.
Some important settings to consider include:
- Changing the default port number to a non-standard value
- Disabling password authentication in favor of public key authentication
- Restricting access to specific users or IP addresses
After making the necessary changes, restart the SSH service to apply them:
sudo systemctl restart ssh
With SSH properly configured, you can now connect to your Raspberry Pi remotely.
Remote Access Methods for IoT
There are several methods for accessing your remote IoT platform using SSH. The most common methods include:
- Using an SSH client such as PuTTY or Terminal
- Setting up a reverse SSH tunnel for secure access behind firewalls
- Utilizing cloud-based services for remote access
Each method has its own advantages and disadvantages, depending on your specific use case and requirements. For example, using a reverse SSH tunnel can be particularly useful when accessing devices located behind restrictive firewalls.
Securing Your Remote IoT Platform
Using Firewalls
Firewalls play a crucial role in securing your remote IoT platform. By configuring a firewall on your Raspberry Pi, you can control which devices and services are allowed to communicate with it.
One popular firewall solution for Linux-based systems is UFW (Uncomplicated Firewall). To install and configure UFW on your Raspberry Pi:
- Install UFW using the command: sudo apt install ufw
- Allow SSH traffic by running: sudo ufw allow ssh
- Enable the firewall with: sudo ufw enable
With UFW enabled, your Raspberry Pi will be protected from unauthorized access and potential threats.
Changing Default Settings
Another important step in securing your remote IoT platform is to change default settings such as usernames and passwords. Using default credentials makes your system vulnerable to attacks, so it's essential to customize these settings.
To change the default password on your Raspberry Pi:
- Run the command: sudo passwd pi
- Enter a new password when prompted
Additionally, consider renaming the default "pi" user to something more unique and less predictable.
Free Options for Remote IoT Platforms
There are several free options available for setting up a remote IoT platform using SSH on Raspberry Pi. Some popular choices include:
- NGROK: A tunneling service that allows secure access to local servers
- PageKite: A service that enables public access to local web servers
- LocalTunnel: A tool for exposing local servers to the internet
These services provide a convenient way to access your Raspberry Pi remotely without the need for complex configurations or expensive hardware.
Common Issues and Troubleshooting
Despite its simplicity, setting up a remote IoT platform using SSH on Raspberry Pi can sometimes present challenges. Some common issues include:
- Connection timeouts due to network instability
- Authentication failures caused by incorrect credentials
- Firewall restrictions blocking SSH traffic
To troubleshoot these issues, you can try the following steps:
- Check your network connection and ensure that your Raspberry Pi is reachable
- Verify that SSH is enabled and properly configured
- Review your firewall settings and allow SSH traffic
By addressing these issues, you can ensure a smooth and reliable remote IoT platform.
Real-World Use Cases
Remote IoT platforms using SSH on Raspberry Pi have a wide range of applications. Some examples include:
- Home automation systems for controlling lighting, temperature, and security
- Environmental monitoring systems for tracking weather conditions and air quality
- Industrial automation solutions for managing machinery and processes
These use cases demonstrate the versatility and potential of remote IoT platforms in various industries and applications.
Conclusion and Next Steps
In conclusion, setting up a remote IoT platform using SSH on Raspberry Pi is a powerful and cost-effective solution for managing and monitoring IoT devices. By following the steps outlined in this guide, you can create a secure and reliable platform that meets your specific needs.
We encourage you to take action by trying out the methods and tools discussed in this article. Share your experiences and insights in the comments section below, and don't forget to explore other resources and tutorials available on our website.
Thank you for reading, and happy building!
Article Recommendations