How To Set Up Free IoT Device SSH: A Comprehensive Guide
Setting up SSH on IoT devices for free is an essential skill for anyone working with connected devices or home automation systems. Secure Shell (SSH) provides a secure way to access and manage remote devices, ensuring your data remains protected. Whether you're a beginner or an experienced user, this guide will walk you through the process step by step.
IoT devices are revolutionizing the way we interact with technology, enabling smart homes, industrial automation, and countless other applications. However, with the increasing number of connected devices, security becomes a top priority. SSH is one of the most reliable methods to secure communication between devices.
This article will explore everything you need to know about setting up SSH on IoT devices for free. From understanding the basics of SSH to advanced configurations, we've got you covered. By the end of this guide, you'll have the knowledge and tools to secure your IoT devices effectively.
Read also:Queen Latifah Kids A Comprehensive Look Into Her Family And Life
Table of Contents
- Introduction to SSH
- Why Secure IoT Devices with SSH?
- Preparing Your IoT Device
- Installing SSH Server
- Configuring SSH
- Connecting to IoT Device via SSH
- Securing Your SSH Setup
- Troubleshooting Common Issues
- Advanced SSH Configurations
- Conclusion and Next Steps
Introduction to SSH
Secure Shell (SSH) is a cryptographic network protocol designed to provide secure communication over an unsecured network. It is widely used for remote login and other secure network services. SSH replaces less secure protocols like Telnet and rlogin, which transmit data in plain text.
SSH operates on port 22 by default and supports various authentication methods, including password-based and public key authentication. Understanding the basics of SSH is crucial before setting it up on your IoT device.
Key Features of SSH
- Data Encryption: Ensures that all communication between devices is encrypted.
- Authentication: Provides secure methods to authenticate users and devices.
- Port Forwarding: Allows secure forwarding of network connections.
Why Secure IoT Devices with SSH?
IoT devices are vulnerable to cyberattacks due to their limited resources and often outdated firmware. Setting up SSH on your IoT devices helps mitigate these risks by providing a secure channel for remote access and management.
With SSH, you can:
- Remotely manage and configure devices securely.
- Monitor device performance and troubleshoot issues.
- Protect sensitive data transmitted between devices.
Security Risks Without SSH
Without SSH, your IoT devices are exposed to unauthorized access, data breaches, and malware attacks. These risks can lead to severe consequences, especially in critical applications like healthcare, finance, and industrial automation.
Preparing Your IoT Device
Before setting up SSH on your IoT device, ensure that it meets the following requirements:
Read also:Discovering Excellence Why Stem School Highlands Ranch Stands Out
- Running a Linux-based operating system (e.g., Raspberry Pi OS).
- Connected to the internet or a local network.
- Updated with the latest firmware and security patches.
Additionally, make sure you have administrative access to the device and know its IP address.
Installing SSH Server
The first step in setting up SSH on your IoT device is installing an SSH server. Most Linux-based IoT devices come with OpenSSH pre-installed. If not, you can install it using the package manager.
For Debian-based systems like Raspberry Pi OS, use the following command:
sudo apt update && sudo apt install openssh-server
Verifying SSH Installation
After installation, verify that the SSH service is running by checking its status:
sudo systemctl status ssh
If the service is not active, start it using:
sudo systemctl start ssh
Configuring SSH
Once SSH is installed, you can configure it to suit your needs. The configuration file is located at /etc/ssh/sshd_config. Open it with a text editor:
sudo nano /etc/ssh/sshd_config
Important Configuration Options
- Port: Change the default port (22) to a custom port for added security.
- PasswordAuthentication: Set to "no" to disable password-based authentication.
- PermitRootLogin: Disable root login for better security.
After making changes, restart the SSH service:
sudo systemctl restart ssh
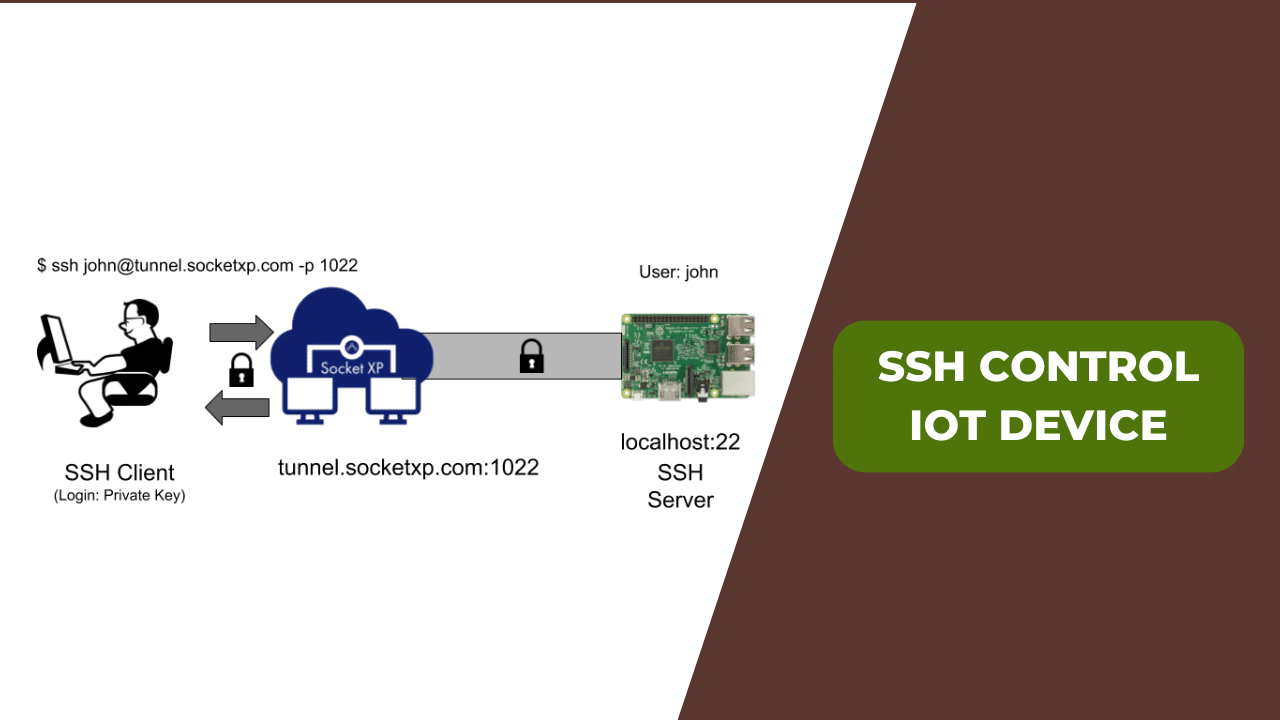
Connecting to IoT Device via SSH
With SSH configured, you can now connect to your IoT device from another computer. Use an SSH client like PuTTY (Windows) or the built-in SSH command (Linux/Mac).
The basic syntax for connecting via SSH is:
ssh username@ip_address
Replace username with your IoT device's username and ip_address with its IP address.
Using Public Key Authentication
For enhanced security, use public key authentication instead of passwords. Generate a key pair on your local machine:
ssh-keygen -t rsa -b 4096
Copy the public key to your IoT device:
ssh-copy-id username@ip_address
Securing Your SSH Setup
While SSH is inherently secure, additional measures can further enhance its security:
- Use Strong Passwords: If password-based authentication is enabled, ensure passwords are strong and unique.
- Limit Access: Restrict SSH access to specific IP addresses or networks.
- Enable Two-Factor Authentication: Add an extra layer of security with tools like Google Authenticator.
Firewall Configuration
Configure your firewall to allow SSH traffic only on the specified port. For example, on Ubuntu-based systems, use:
sudo ufw allow ssh
Troubleshooting Common Issues
Even with careful setup, issues can arise. Here are some common problems and their solutions:
- Connection Refused: Ensure the SSH service is running and the port is open.
- Permission Denied: Check file permissions and ownership of SSH keys.
- Timeout Errors: Verify network connectivity and firewall rules.
Debugging SSH
For more detailed information, enable verbose mode when connecting:
ssh -v username@ip_address
Advanced SSH Configurations
Once you're comfortable with basic SSH setup, consider exploring advanced configurations:
- Port Forwarding: Securely forward network connections through SSH.
- Tunneling: Create encrypted tunnels for secure data transfer.
- SSH Agent Forwarding: Enable seamless authentication across multiple devices.
SSH Tunnels
SSH tunnels allow you to securely access services on your IoT device from a remote location. For example, to access a web server running on your device:
ssh -L 8080:localhost:80 username@ip_address
Conclusion and Next Steps
In conclusion, setting up SSH on IoT devices for free is a straightforward process that significantly enhances security. By following this guide, you've learned how to install, configure, and secure SSH on your IoT device.
To further improve your skills, consider exploring advanced topics like SSH tunneling, certificate-based authentication, and automation scripts. Remember to always stay updated with the latest security practices and patches to protect your devices.
We encourage you to share this article with others who might find it useful. If you have any questions or feedback, feel free to leave a comment below. Happy securing your IoT devices!
Article Recommendations